This is a step-by-step guide on how I created the blog you’re reading right now.
You can find all the code in my repo.
Blog containig posts about my hobby projects. Created with Obsidian, Hugo and Github Pages.
Why Write a Blog? #
Ever wanted to share your experiences or projects but weren’t sure where or how to start? That’s exactly how I’ve felt. I have been working on so many projects lately and I wanted to share a little bit of my experience.
I’m not a professional writer, but a professional “fuck stuff up” guy and believe me that happens more often than it should. Most of the time it pays off and I learn from these mistakes and that’s why you are reading this.
If you’re setting up your own blog, don’t be afraid to fuck things up a bit. You’ll learn way more from experimenting than just following a guide on the internet.
Blog Options #
When I was considering writing my own blog my biggest priority was convenience. I wanted something that fit my workflow.
As I recently started using Obsidian I was looking into options how to take advantage of that.
Mostly I didn’t want to be tied down by a specific format which would make transition to different format challenging in the future.
Obsidian Publish #
Obsidian publish is pretty nice if you want something that works out of the box. Is completely compatible with Obsidian and has some customisation.
Unfortunately it’s a paid service of $8/month that is with yearly subscription, $10 if you go monthly. Maximum size of site is 4 GB.
I don’t want to be bothered by limited size of my page or other specifications which I would need to tip toe around.
I agree that for most people this solution is okay. But if you want it cheap there’s better way.
Quartz #
Quartz is an open source alternative to Obsidian publish. It fully supports Obsidian and is customizable.
However customisation is harder and there is not that much community driven themes that I would find pleasing. The layout is similar to Obsidian vault which makes it impractical for blog site.
Hugo #
Hugo is an open source framework that generates static sites from markdown files. It is not fully Obsidian compatible but I chose it anyway.
I selected this framework for 4 key reasons:
- Open source -> I can see how the code works
- Generates static files -> can be hosted on GitHub pages
- Fairly popular -> easier to find resolution for problems
- Customisable with community themes
To be honest, setting up Hugo is easy but there are some obstacles and it is not plug and play. However, I was confident that I could make the most of its features and reach the desired result.
Setting up Obsidian with Hugo #
Workflow #
The process of writing blog is simple:
- Write the post in Obsidian
- Copy blog post using shell-commands plugin to a git repository
- Generate content and check the outcome in browser
- Push to GitHub
- GitHub workflow will deploy the page automatically on push to main branch
Tools #
Step by step #
Obsidian #
Using Hugo with Obsidian brings some limitations. So to have the least amount of work when publishing from Obsidian I follow these rules.
1. Directory Structure #
Choose your blog structure
Hugo supports 2 styles of directory structure.
- Directory as a post where you need to supply
index.md
├─ blog
   ├─ posts
	  ├─ 01-post-name
		 ├─ index.md
		 └─ images
		     └─ image-name.jpg
- Single markdown files as a post
├─ blog
   ├─ posts
	  ├─ 01-post-name.md
	  └─ 02-post-name.md
Here I went with first option because it keeps assets together as I have images or other material for the posts.
Another tip is the numbering in front of post names for two things. First you will know how many posts you have. And second you know the order in which they came out and would have been difficult to filter later.
2. Front Matter Template #
Every post must have a Front matter
Front matter is part of file which includes metadata used by Hugo to decide what to do with content. You can use Templater plugin for more complex templates but the integrated templates were good enough for me.
My blog template looks like this.
---
title:
published: {{date}}T{{time}}
modified:
draft: true
summary:
tags:
---
For Hugo to parse the published metadata correctly you need to follow dates format.
Here I encountered the first problem!
When publishing posts they won’t appear if their time is in future. So let’s say you provided the correct time and the post isn’t on the blog. What now?
By default Hugo will make assumption that your time zone is UTC. This might be bothering because sometimes you just create a quick post or want to test something out and you don’t see your post on the page.
To fix this you need to use HH:mm:ssZ for your time format. This will add your zone shift to the time.
3. Naming Files #
Replace white chars in file names with dashes
To avoid formatting problem when migrating Obsidian markdown to regular markdown I name my files so that any white chars are replaced with dashes.
That’s because Obsidian uses char %20 for white chars which are incompatible with regular markdown.
Example
From: 001 hello world.md
To: 001-hello-world.md
GitHub Repository #
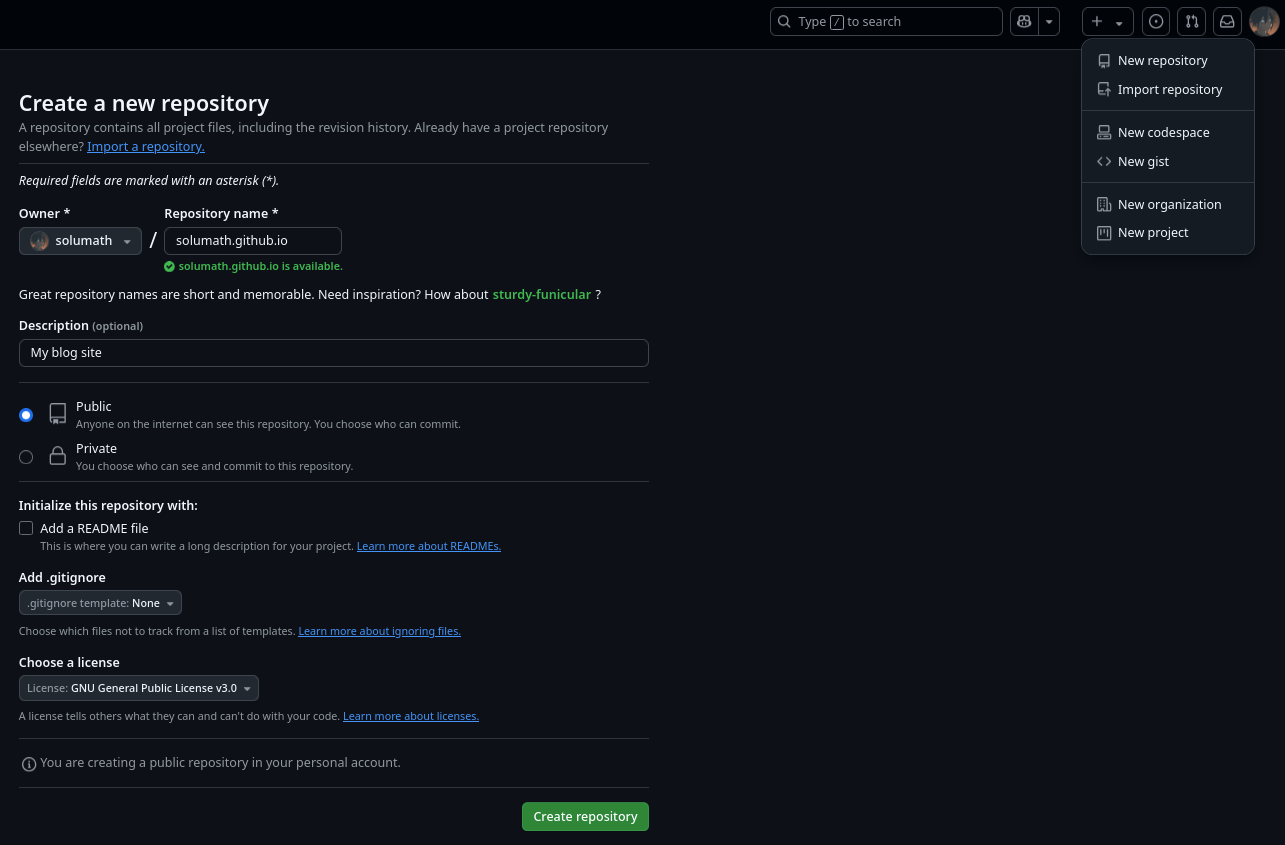
Create repository with name [your-name].github.io.

And copy your repository.
git clone git@github.com:[your-name]/[your-name].github.io.git
Hugo #
Every Hugo theme has its own options how to install it. I use git modules since it is easy to update and there won’t be conflicts with my changes.
For my page I used Blowfish theme. Follow their installation guide.
After you are done you should have structure similar to this
.
├── assets
│   └── img
│       └── author.jpg
├── config
│   └── _default
├── content
│   ├── _index.md
│   ├── about.md
│   └── posts
│       └── _index.md
└── themes
    └── blowfish
Now all that’s left is to copy our posts from obsidian to content/posts. You can do it with CLI or use the shell-commands plugin.
# macro for shell-commands
# {{!_blog_path}} is my custom defined variable
cp -a {{!vault_path}}/[your-name].github.io/* {{!_blog_path}}/content/posts
Generate the content for Hugo using
hugo
Or if you want to run the server to see the changes
hugo serve
Both of these commands will create static content in public folder which you need to commit too.
Commit your changes after you are done
git add .
git commit -m "new post"
GitHub Pages #
For deploying our blog we will need our domain and server so users can see our website.
Fortunately GitHub has free service called GitHub Pages which offers you subdomain and server. Which is perfect for testing deployment for such project. This however comes with limits as what your page can do:
- Only static content, no databases or dynamic content. That means you can’t have comments on your website if you later wanted to add them.
- Site can’t be larger than 1 GB.
- Maximum bandwidth of 100 GB per month.
- and more …
1. Create GitHub Page #
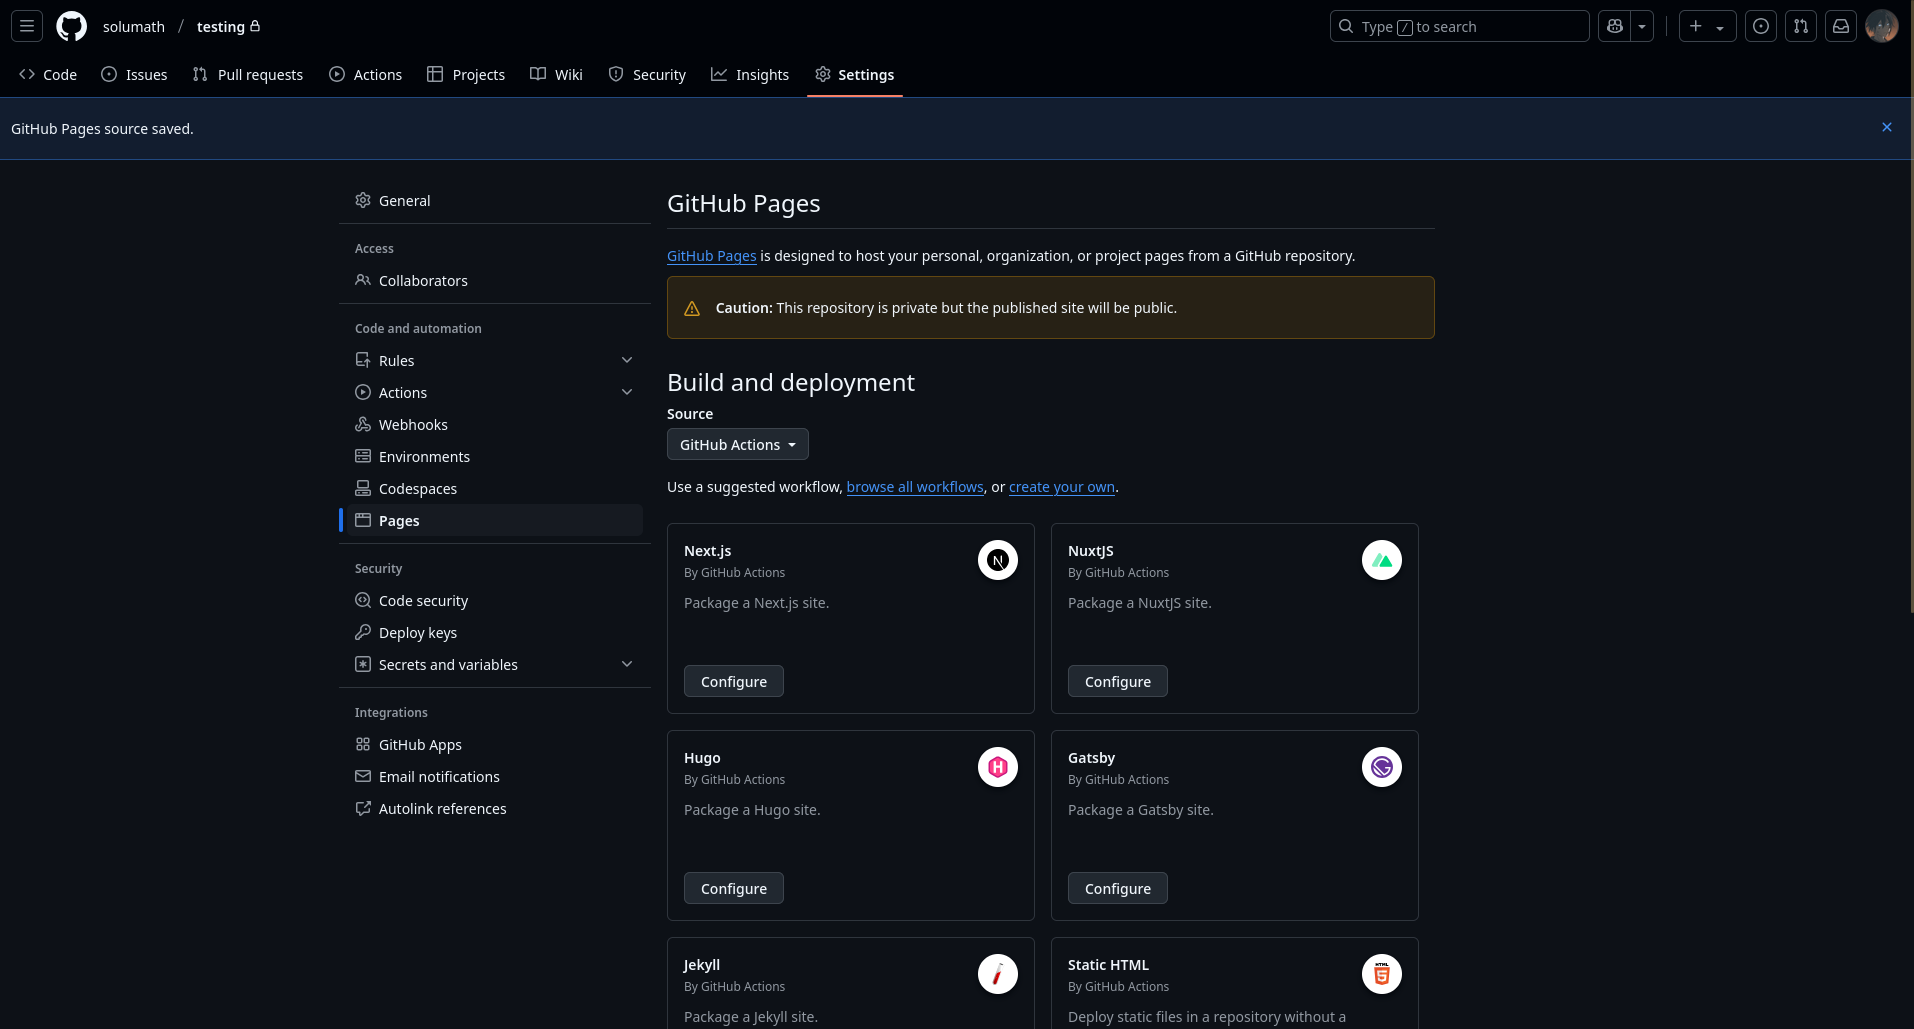
To create GitHub page follow their documentation. For our use case we will change the workflow how to deploy the page.
When you setup your repository go to settings and change the Build and deployment source to GitHub Actions.

2. Create GitHub Workflow #
Follow the Hugo documentation.
Here is copy of my workflow that makes sure that anytime I push the changes to main branch, the page will be rebuilt and pushed online.
Paste this into .github/workflows/hugo.yaml.
# Sample workflow for building and deploying a Hugo site to GitHub Pages
name: Deploy Hugo site to Pages

on:
  # Runs on pushes targeting the default branch
  push:
    # you can add more branches to the list
    branches: ["main"]

  # Allows you to run this workflow manually from the Actions tab
  workflow_dispatch:

# Sets permissions of the GITHUB_TOKEN to allow deployment to GitHub Pages
permissions:
  contents: read
  pages: write
  id-token: write

# Allow only one concurrent deployment, skipping runs queued between the run in-progress and latest queued.
# However, do NOT cancel in-progress runs as we want to allow these production deployments to complete.
concurrency:
  group: "pages"
  cancel-in-progress: false

# Default to bash
defaults:
  run:
    shell: bash

jobs:
  # Build job
  build:
    runs-on: ubuntu-latest
    env:
      # Update to the release compatible with your theme
      # https://github.com/gohugoio/hugo/releases/latest
      HUGO_VERSION: 0.143.1
    steps:
      - name: Install Hugo CLI
        run: |
          wget -O ${{ runner.temp }}/hugo.deb https://github.com/gohugoio/hugo/releases/download/v${HUGO_VERSION}/hugo_extended_${HUGO_VERSION}_linux-amd64.deb \
          && sudo dpkg -i ${{ runner.temp }}/hugo.deb
      # Dart Sass is optional, check if your themes/modules really need it
      - name: Install Dart Sass
        run: sudo snap install dart-sass
      - name: Checkout
        uses: actions/checkout@v4
        with:
          submodules: recursive
          fetch-depth: 0
      - name: Setup Pages
        id: pages
        uses: actions/configure-pages@v5
      - name: Install Node.js dependencies
        run: "[[ -f package-lock.json || -f npm-shrinkwrap.json ]] && npm ci || true"
      - name: Build with Hugo
        env:
          HUGO_CACHEDIR: ${{ runner.temp }}/hugo_cache
          HUGO_ENVIRONMENT: production
          TZ: America/Los_Angeles
        run: |
          hugo \
            --gc \
            --baseURL "${{ steps.pages.outputs.base_url }}/"
      - name: Upload artifact
        uses: actions/upload-pages-artifact@v3
        with:
          path: ./public

  # Deployment job
  deploy:
    environment:
      name: github-pages
      url: ${{ steps.deployment.outputs.page_url }}
    runs-on: ubuntu-latest
    needs: build
    steps:
      - name: Deploy to GitHub Pages
        id: deployment
        uses: actions/deploy-pages@v4
After you are done with changes you can just push it to GitHub
git add .
git commit -m "add hugo deployment"
Push #
After you committed all your changes and have the workflow setup. You can push your changes to your repository
git push
And after a while you should see your blog at https://[your-name].github.io.
References #
- https://github.com/solumath/Blog
- https://obsidian.md/
- https://github.com/jackyzha0/quartz
- https://git-scm.com/
- https://github.com/
- https://docs.github.com
- https://gohugo.io/
- https://github.com/SilentVoid13/Templater
- https://blowfish.page/
